Friday, August 19, 2011

Whole Wheat Tomato Basil Bread

T3-


T cubed has gone south to visit our parents. For most people, the extra sun might spark ideas of swimming in pools, eating ice cream, and tanning. I was struck by the idea that bread would rise like crazy in the heat. Yeah, I can be weird like that. 


While plain whole wheat bread it good, a can of tomatoes sitting in the pantry gave me an idea. Why not spice it up with a tomato basil variation? Heck, if they make tomato basil bagels, why not a tomato basil bread?


It's like all the goodness of the pizza in one healthy snack, which is even more delicious with olive oil and balsamic vinegar.


RECIPE

  • 3 cups Whole Wheat Flour
  • 2 cups Warm Water
  • 1 tsp Yeast
  • 1/2 tsp Salt
  • 1 Can of Diced Tomatoes
  • ~2 tbsp Italian Herbs (e.g. Basil, Thyme, Oregano,Tarragon) depending on how herby you like your bread
  1. Combine first four ingredients. This should form a pretty wet dough that is very sticky
  2. Let rise in the sun outside for ~1 hour until doubled in size (Note: using plastic wrap and a metal bowl will cause it to heat up rapidly; I ended up covering my in a towel over the plastic wrap)
  3. Drain the tomatoes, keeping the juices. Then rinse the tomatoes (to remove excess sodium they usually pack in with canned foods) and add them to the dough. (Note: I added the tomatoes at this step so their acidity wouldn't retard the growth of the yeast)
  4. Add herbs to taste. Knead until incorporated 
  5. Oil a cookie sheet and place the lump of dough in the middle. It will spread out with time. 
  6. Let the dough rise outside for ~1 hour again until doubled in size
  7. Preheat the oven to 450 degrees. Also, put a oven-proof, non-rustable container (I used a ceramic pie pan) filled with water inside. This will create a moist environment in the oven that is conducive to a better crust. 
  8. Using the reserved tomato juices, paint the top of the dough. Beyond infusing the dough with more tomato-y goodness, this gives the crust a little extra sugar, which helps with the caramelization that creates a crispy crust. 
  9. Put in the oven for ~30 min
  10. Enjoy!
Calorie Counters: The entire recipe has 1300 calories, 52 g protein, 6 g fat, and 43 g fiber

Strawberry Peanut Butter Breakfast Blondies

T3-

It has been brought to my attention that much of the world doesn't understand the beauty of peanut-butter-covered strawberries. This combination, I dare say, rivals the perfection of chocolate-covered strawberries. If you have not tried the two together, please run to your peanut butter jar now with strawberry in hand. 

However, strawberries and peanut butter hardly classifies a meal in itself, as much as I would like to believe otherwise. Ergo, I decided to revamp the combination with a little inspiration from Chocolate Covered Katie's blondies to make a higher protein, ultra-satisfying meal. 


While Chocolate Covered Katie calls hers blondies, mine have no sugar, so the sweetness is a little understated. Thus, mine are called breakfast blondies to emphasize that they aren't really a dessert per se, but a very delicious, not bean-y tasting, breakfast treat. 

I had my little brother who is known for his sensitive palate taste it, and he had no idea there were beans in it!

Without further ado, 

RECIPE
  • 1/3 cup Peanut Butter (I used Nuttzo multi-nut butter, which tastes very peanut buttery)
  • ~15 Strawberries
  • 1 tsp Vanilla Extract
  • 1 tsp Almond Extract
  • 1 tsp Baking Soda
  • 1 can White Beans
  1. Dice Strawberries into chunks
  2. Combine all ingredients
  3. Blend batter until beans are pureed (I did this with just a spoon and some elbow grease, but I think you could also do this in a food processor or blender)
  4. Bake at 350 degrees for 1 hour
  5. Enjoy!
For those counting, the entire recipe has about 900 calories, 46 g protein, 26 g fiber, and 45 g healthy fat. 

Saturday, July 9, 2011

Tropical Bread

T2-


Tropical Bread


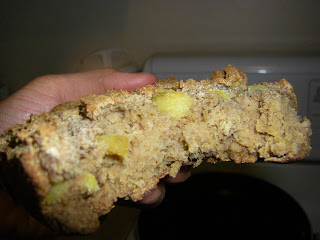
   As you can see the bread was already half-way gone by the time we remembered to take any pictures!


After a long week of classes, research, essays, homework, meetings, studying, etc. --- We needed a break. BAD. 


Ideally, in my mind , this break would have involved a trip to the tropics...


  • Sitting on the beach
  • Drinking Fruity Smoothies w/ little umbrellas
  • Reading novels (ahem...NOT textbooks)
  • Lots of coconuts. And Bananas. And Berries. Okay...lots of food in general.

Unfortunately, we have neither the time nor the money to travel to Tahiti or Hawaii right now. So, we decided to bring the tropics to us! 


We recently bought some coconut flour at Whole Foods...


We had several rather brown bananas sitting in our fruit bowl...


We had some new 9 x 5 bread pans....


Coconut flour + Bananas + Bread Pans = Tropical Bread of course!


             Oh yes. Those yellow chunks are indeed pineapple pieces!


Recipe:(Adapted from Fat Free Vegan's Blueberry-Banana Bread)


  • 3 brown bananas
  • 2 Tbsp of Coconut Butter
  • 1/2 Cup Pineapple pieces
  • 1/3 Cup Unsweetened Soymilk
  • Few drops liquid sweetener (Vanilla) + other vanilla flavoring as desired
  • 1 Cup Coconut Flour
  • 1 Cup Spelt Flour
  • 1 + 1/2 tsp. Baking Soda
  • 1/2 tsp. salt

Instructions:

  1. Pre-heat oven to 350 degrees.
  2. Peel and slice bananas and place in a microwave-safe dish. Melt in the microwave and then mash to a creamy texture (chunks are fine... in fact they make the bread even more delicious in my opinion). Stir in coconut butter.
  3. Add pineapple pieces, soymilk, and vanilla flavoring(s) to a microwave-safe mug. Heat for 45 seconds then let sit for two minutes. 
  4. While heating/cooling is happening, mix coconut flour, spelt flour, baking soda, and salt in a large bowl.
  5. Add the soymilk mixture to the mashed/melted bananas and stir until the mixture is homogenous.
  6. Add the banana/soymilk mixture to the bowl containing the dry ingredients. Mix well. Mixture should be able to be worked by hand.
  7. Press mixture into a greased 9 x 5 bread pan. 
  8. Bake for 50 minutes (or until inserted knife comes out clean).
  9. Let cool, Eat and Enjoy! *
*Note : If you can wait for the bread to cool, bravo. I can't. I thought the bread was AMAZING warm though...especially topped w/ vanilla bean coconut ice cream! 

Emily (or T3) especially enjoyed the bread...


               Yes -- I think she agrees the bread was amazing.


Pure deliciousness. True Story. 


Now back to life. If only everyday could be Saturday...


Wednesday, July 6, 2011

Peaches and Cream!

T3-

In middle school, my friend's favorite pseudo swear was "Peaches and Cream!" With peach season upon us, I couldn't help but have some fun and celebrate old memories with...

PIE!


I've never made a pie crust before, and I admit, this crust didn't turn out super flaky. Still, the sweet of the peach, the creamy of the banana cream, and the savory of the crust all work so well together.

As always, the recipe is refined sugar-free and oil-free, and it tastes good!

I may or may not have ended up eating the entire thing, by myself, in a day ;)

Recipe

Pie Crust
½ cup whole wheat flour
¼ cup coconut butter
2 ½ tbsp water

Chill ingredients after measuring. Mix together roughly and add the water until just holds together. Place in pie tin and chill overnight.

Bake at 350 for 12 minutes with pie beans (or rice, since I didn’t have dried beans) and then 7 minutes without. On second thought, I think the whole wheat is heavy enough you probably don't need pie beans. Chill.

Peach Filling
2 peaches
3/4 tsp agar powder

Blend peaches (I didn’t skin them). Heat on stove until boiling. Add agar and mix. Remove from heat

Banana Cream
1 ¼ cup Milk or Milk Alternative (I used almond milk)
1 tsp agar powder

Heat milk in a mug for 45 sec. Add agar and mix. Continue to heat until boiling in 30 sec intervals, with stirring in between.  Refrigerate overnight. Blend milk gel with 2 bananas until creamy.


Take cooked pie crust and add peach slurry. Chill in the fridge until firm. Add banana cream on top and serve with a smile.


Tuesday, June 14, 2011

Mint Chocolate Applesauce?

T3-

Applesauce usually plays only a secondary role as sweetener/consistency-helper in desserts. There's a reason for this. While applesauce can be a dessert by itself, it's a little mundane. Thus, while I was tinkering in the kitchen/procrastinating studying, I decided to try jazzing up good ol' applesauce.

Cocoa powder is always good, but for a summery spin, I decided to throw in a little peppermint extract.  Bye-bye boring! I relearned my love of mint chocolate. 

So, if you're feeling adventurous with your no-sugar-added desserts, give this a try for only 40 calories. 

Recipe
  • 1/4 cup Applesauce
  • 1 tsp Cocoa Powder
  • 1 dash Peppermint Extract
    Yes, as a matter of fact, I do eat all my food in mugs

    Mix and Enjoy!
Also, for people concerned about protein. In the original version of the recipe, I added equal amounts of hemp protein powder and cocoa, and the hemp flavor was completely masked. So feel free to spike the recipe with protein powder. 

Saturday, June 11, 2011

Cherry Coco-nutty Granola

T3-


I was betrayed today. At the farmer's market, I picked up a seemingly innocent box of granola. On the front, it listed oats, almonds, cranberries, coconut, and apple juice. I was ecstatic to enjoy some healthy, no-added sugar or oil granola. 


Not quite. Apparently this wasn't the real ingredients list but just the main flavorings. On the back, I found a list including sugar and oil. Grr.....


So, I decided to make my own granola out of healthy, whole ingredients, as there really does seem to be a lack in this field. Have you seen how many granola recipes out there are drowning in oil and sugar? Plus, I had a healthy fat source to try out. 


Presenting, coconut manna!


It's in the coconut butter family, and, although I hesitate to write this, I think it just might be better than peanut butter. (Gasp! I'm sorry peanut butter, but it's true.) I've had it with dates, carrots, and a spoon, and it imparts a subtly sweet decadently rich flavor to it all. The best part?


Its just pure coconut! I warn you, when you first get the jar, its a pain to homogenate. I spent a good half an hour at least soaking the jar in hot water and then attacking it with a spoon to try and get the oil on top to mix with the rock hard sediment on the bottom. But, you know, it was definitely worth the effort. 


So, armed with my new coconut manna and some dried tart cherries we also picked up at the farmer's market, I headed to the kitchen. After a few tweaks on my original recipe, I managed to create something that my sister and even my brother can agree is quite good. 


Recipe
(Serves 1-2)


  • 1/2 cup Oats
  • 1/4 cup Dried Tart Cherries (or substitute dried fruit of choice)
  • 1/4 cup Almonds (or substitute nut of choice)
  • 1/4 cup Sweetener (I used Stevia. Note: my brother thought it should be sweeter, so you can play with this if you have a sweet tooth)
  • 1 tbsp Coconut Manna
  • 1 tbsp Hot Water (Yes, it really does need to be hot)
  • 1/4 tsp Vanilla Extract
  • 1/4 tsp Almond Extract
  • 1 pinch Salt
NOTE: For fruit-sweetened granola, leave out the water and stevia, and use 1/3 of a banana (melted in the microwave for 30 sec) and 1 1/2 tbsp applesauce

1. Chop up the almonds
2. Place all the ingredients beside the hot water in a bowl, and mix. The coconut butter will not really blend in that well assuming your kitchen is kinda cold like ours, but just do your best. 

3. Heat up the water and place into the bowl and mix. Now, the oats should cling together a little, but mostly be separated. 
4. Place in the over at 350 for about 15 minutes until lightly crisp. Stir often so that it doesn't burn.
Before

After
5. Let cool, and enjoy!


If you're like us, waiting for food to cool when it is hot out of the oven is blasphemy. Needless to say, we ate our granola on the spot. However, if you want your granola good and crunchy, I would recommend cooling it. 


UPDATE:


For those who are wishing for a fruit-sweetened granola, not a stevia-sweetened one, T3 comes to the rescue! I made a triple batch of the above subbing the water and stevia for a melted banana (microwave the banana for 1 minute and stir until liquid-y) and 1/4 cup applesauce. For a single batch, use 1/3 of a banana (melted) and 1 and 1/2 tbsp applesauce. 

Thursday, June 9, 2011

Peanut Butter Cup Pudding

T3-

Peanut butter and chocolate.


 Need I say more?

Inspired by the Reese's Peanut Butter Cup Blizzard (which I haven't had in years), but slimmed down, sugar-limited, defatted, and un-dairied.  And it still tastes great! This healthy dessert has 110 calories, 5 g fat (none saturated), 1 g sugar, and 7 g protein. Just for comparison's sake, a small Blizzard has 530 calories, 62 (!) grams of sugar,  21 grams of fat (11 of which are saturated), and 13 g protein.

Plus, no cows were harmed in the making of my product.

Without further ado

Recipe
  • 1 1/4 cup Almond Milk
  • 1 heaping tsp Agar Powder (I think this is around 1 tbsp Agar Flakes)
  • 2 tbsp PB2 (you can experiment with actual peanut butter or almond butter if you want here)
  • 1 tbsp Cocoa Powder (brownie points for fair trade/organic!)
  • 2 tbsp Sweetener (I used Stevia in the Raw, which measures like sugar)
  • 1 pinch salt
  • Optional Protein Powder (if you want to use this as a post work-out snack)
  1. Microwave almond milk in mug for about 30 sec in microwave
  2. Add remaining ingredients and stir (all might not dissolve, so give it your best shot and move on to step three)
  3. Microwave at 30 sec intervals, stirring in between until mixture is hot and all is dissolved
  4. Refrigerate for several hours
  5. Enjoy!

If you want it extra smooth, I would recommend placing it in the blender after it's done. Plus, if you wanted, you could really go for the Blizzard effect: add a frozen banana and blend!

Have fun!

Wednesday, June 8, 2011

Chocolate-Covered, Pistachio-Crusted Turkish Apricots

T3-

What's better than fruit?

Chocolate-covered fruit!

What's better than chocolate-covered fruit?

Chocolate-covered fruit with nuts!


I love me my pistachios. They are probably my favorite type of nut, so it only made sense to somehow combine them with chocolate, my sister's favorite food. And with Whole Foods having a sale on organic unsulfured Turkish apricots (which are a darker cousin of the regular dried apricot with more depth and a caramel undertone, my sister and I agree.), we found a match made in heaven.

Chocolate-Covered, Pistachio-Crusted Turkish Apricots

Doesn't that just sound decadent? And, it's completely healthy with only about 35 calories a pop! Thus, you can be like me and consume ten of them before they even had time to cool. 

Also, for theme and variation, I also spiced it up with some cinnamon-sprinkled, chocolate-covered Turkish apricots plus PB2-coated, chocolate-covered Turkish apricots and finally PB2-coated, cinnamon-sprinkled, chocolate-covered Turkish apricots.


Yum!


Scrumptious!


Delish!

I hope you enjoy them as much as I do!

Recipe
  • ~30 Dried Turkish Apricots (any apricot will probably work here, or even any large dried fruit. Have fun with it!)
  • 1/2 cup Shelled Unsalted Pistachios
  • 1 Dark Chocolate Bar (3-4 oz)

  1. Grind pistachios. I did this by putting the nuts in a cereal bowl, stacking another cereal bowl on top, and then grinding. I think pulsing them a few times in a blender or food processor would be more efficient. Still, what's cooking without a little elbow grease?
  2. Break the chocolate bar into pieces and place in a mug. Melt chocolate at 30 second intervals in the microwave, decreasing the amount of time as it gets closer to melting. Stir between each go. It shouldn't take too long, and if there are only a few chunks left, just stir for a moment, and they should all melt and homogenate. 
  3. Dip apricots individually into chocolate, then dredge through ground pistachios
  4. Leave to cool on a non-stick surface such as parchment paper or plastic wrap
  5. Enjoy!
:)

Monday, May 23, 2011

Lean Mean Green Machine

T3- 


Who likes vegetables? 


Not me!


 In fact, for the first several years of my vegetarianism (I started when I was seven), I was known as the vegetarian that doesn't eat vegetables. Vegetables are just not as sweet as fruit, as savory as nuts, beans, and legumes, or as filling as grains. Still, vegetables contain lots of important vitamins and minerals, making them an intrinsic part of a balanced diet, vegan, vegetarian, or otherwise. 


Thus, I've found ways to sneak them into my diet. Usually this includes drenching them in tomato sauce and nutrional yeast.


The other way I've found is to put it in a protein shake. The protein powder really mellows the taste, plus it provides protein, which is very important for active vegans.  So, without further, I give you my Lean, Mean, Green, Machine.


Before Blending


After Blending: So, it's not the most photogenic shake, but I swear it's tasty!


RECIPE

  • 1 scoop protein powder (I get mine from the website, True Protein. It is a combination of rice, pea, and hemp proteins plus essential amino acids)
  • 5-6 Strawberries
  • 2 packed Cups Spinach
  • 1 cup Almond Milk

Put ingredients in Blender
Blend. That's it!

It's about 200 calories and 26 g protein (depending on your protein powder)

Plus, it's a breeze to clean up. Fill your blender half full with water and add a little soap. Let it run for a second, then wash it out. No scrubbing needed!


Saturday, May 21, 2011

Theoretical Redheads

T3-

Question

Okay, so, in the beginning, there were brownies. Then came blondies and “blackies” (brownies made with black beans). Aren’t we forgetting someone here?

Background Research

Did a Google search, and found only two recipes for “redheads.” One included red food coloring, which I believe is cheating. The other had carrots and didn’t seem very red at all to me.

Hypothesis

A healthy, vegan "redhead" can be created through use of natural ingredients

Experiment


Using this amazing recipe from Chocolate Covered Katie (link) as a foundation, I mixed things up to make it a natural red. This included 1 cup frozen cherries and kidney beans instead of chickpeas.

Analyze Your Data


Uh, I think the picture speaks for itself.

Conclusion

There is in fact a reason for the lack of “redheads” in the baking world. Both kidney beans, which look very red on the can, and cherries have a distinct bluish element that push them into purple range when pureed. However, this does not affect their taste, and they still turned out as scrumptious cherry-chocolate bars.

Without further ado,

Theoretical Redheads

1 can Kidney Beans (~1 and ¼ cups)
1 cup Cherries (I would recommend upping this to 1 and 1/2 or even 2 cups for more distinct cherry taste)
1/3 cup Flaxseed
3/4 cup Stevia
1 tsp Almond Extract (1 and 1/2 or 2 tsp of almond extract would give a greater cherry taste as well)
1/2 tsp Baking Powder
1 tsp Cinnamon
1/2 Dark Chocolate Bar, chopped or 1/4 cup Chocolate Chips (Optional)

Microwave cherries in 1 minute segments until soft and juice extrudes. (Watch it carefully so it doesn't boil over...)
    Note: Spoon was not in the cup while microwaving...
Puree kidney beans and cherries until smooth (or until your blender refuses to work anymore)


Mix puree with flaxseed, almond extract, baking powder, cinnamon, stevia, and chocolate.


Pour into an 8” by 8” pan (or pie tin if you are an inadequately prepared college student.


Bake at 350oF for 30 minutes and let cool


Enjoy!

(Calorie count for the whole thing is about 1000 calories (healthy calories!). Without the chocolate, it reduces to 700 calories.)